General, quoting & support.
Add: Building E, No.58, Nanchang Road, Xixiang , Baoan District Shenzhen City, Guangdong, China
Tel : 0755-27348887
Fax : 0755-27349876
E-mail : svc@pcbastore.com
What is Ball Grid Array Soldering on PCB?
Simon / 2021-01-13
Contents [hide]
What is BGA Soldering?

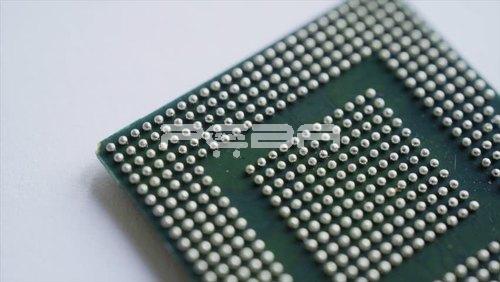
Ball Grid Array Soldering, also known as BGA soldering is becoming the key alternative of packaging high input and output devices as the present-day industry demands. Unlike the other packages like quad flat pack that use pins, BGA soldering packages make use of a grid-like pattern, and thus the name ball grid array. The grid pattern consists of pads with balls of solder for connections to a PCB board with a matching set of copper pads to complete the circuitry.
How BGA is Soldered to A PCB
Before BGA soldering was ever attempted, there were fears of whether soldering BGA packages could be as reliable as the forms of soldering already existent. This was because since the pads are located under the device, they were not visible during soldering which required strict adherence and optimization of the correct method. Even so, an inspection must follow and rework if there are imperfections.
BGA soldering methods have improved significantly to a point where if the process is properly set up, IT can surpass the reliability of soldering quack plat packs. Due to the higher reliability, you'll often find BGA assemblies produced in scale.
BGA soldering process utilizes a technique known as reflow. The process requires a reflow oven to melt the solder balls. When the whole BGA assembly is heated to a certain temperature, the solder balls underneath the components melt.
The reflow oven has very intricately controlled heat, while the solder ball has a precise amount of solder. When the oven heats the assembly, the solder balls melt. The surface tension of the molten solder allows the package to remain aligned to the circuit board as the solder cools.
To ensure each molten solder ball stays separate from the adjacent molten balls, the composition of the solder alloy is also carefully controlled, just like the reflow temperature. This is possible because the solder properties along with the specific reflow oven temperature result in a partially molten solder ball.
BGA Soldering by Hand
Generally, BGA soldering involves two tough parts, and that's a rework and hand soldering. You really need practice to be able to do these two tasks satisfactorily. Let's look into how you should solder and desolder BGA packages by hand.
Desoldering by hand
The most common form of heating when desoldering BGA packages is hot air. We shall consider this method. So, how do you use hot air to desolder BGA? Let's find out.
Steps:
Begin by applying a layer of liquid flux on the sides of the BGA package.
Next, preheats the package from the bottom using a preheater, and on top using hot air for the hot air rework system.
Heat the top of the package using an appropriate BGA nozzle.
When the solder balls under the BGA package have melted, use an appropriate tool to pick up the package. You can use a pair of tweezers or a vacuum pick up tool for this purpose.
That's all! Sounds simple but requires a great deal of practice and experience. It'd be better to learn with spoilt BGA packages before venturing into desoldering functional BGA pack.
Soldering BGA by hand
Just like with BGA desoldering, hand soldering is best done by the hot air method. Although it may not be tough for someone used to soldering components to PCBs by hand, this one requires extra care, lest the solder balls short-circuit themselves, or some connections fail to establish.
Steps:
Start by removing the BGA package and cleaning the pad to get rid of excess solder on the PCB.
Apply a generous amount of flux paste on the pad. The flux serves to keep the balls stuck and prevent them from shifting positions. This is why you cannot use liquid flux for this step.
Place and arrange the balls on the board. You need to be extra careful here, so take your time.
Apply some more flux to the soldering side of the package. This is the bottom side.
Again, carefully place and align the BGA package on the solder balls.
Preheat the package first and then use a hot air blower to heat the top and the bottom of the package.
After the balls melt, they'll get soldered onto the BGA package.
BGA soldering by hand is not the best thing for a beginner. Ensure you have adequate skills before you ruin your precious components. Nevertheless, this technology can be very reliable if done correctly especially due to the low heat resistance in BGA.
How to Check BGA Soldering
As mentioned earlier, BGA soldering was initially faced with a lot of skepticism over whether all the solder balls would sufficiently melt and bond perfectly without direct manipulation. When this technique was used commercially, there was the need to subject the soldered components to tests on reliability.
The BGA solder joint ae located underneath the board making a visual inspection next to impossible. The electrical performance of the joints can be tested to ascertain conductivity, but that does not reveal the state of the joint. The joint could fail in the future even though it presently conducts.
The only reliable method of BGA inspection is by the use of an X-ray that can �see' through the components. This inspection technology is known as Automated X-ray Inspection and has been adopted as the benchmark technique of BGA inspection.
BGA Soldering Technologies
BGA soldering is done in four primary methods, commonly referred to as BGA soldering technologies. To understand these technologies, let us first look at the general process of BGA soldering. Essentially, it involves:
A solder paste is first printed onto the PCB on a pad array. Flux or stencil is then applied to coat the pad.
An automated robot picks and places the BGA components onto the PCB in an aligned manner.
The PCB is now ready for the reflow soldering in a reflow oven.
The BGA soldering technologies will thus revolve around:
Solder paste printing
Component mounting
Reflow soldering, and
BGA rework
a) Solder paste printing
The quality of the solder paste affects the soldering quality. You should therefore pay attention to factors such as excellent printability and solderability as well as lesser contaminants.
The particle diameter of the solder paste must be compatible with the components' lead pitch. Although solder paste with a larger particle diameter gives a better soldering quality than one with a small diameter, it would be best not to exceed 45μm particle diameter for soldering BGA components.
The stencil also needs to be made of stainless steel and its size must be maintained between 0.12-0.15mm, which is the common range. The stencil thickness is usually smaller than the pad but is it's normally determined by the components you're working with.
A 60-degrees stainless metal scraper is applied during the printing process. The pressure (printing pressure) lies between 35N and 100N, while the printing speed must be maintained within 10-25mm/s. other conditions include the field temperature which needs to be around 25�C and relative humidity which needs to be maintained between 55% and 75%.
Finally, to reduce the exposure time of the solder paste to air, the PCB board should enter the reflow oven within 30 minutes after printing. Prolonged exposure of the paste to air would reduce the product quality significantly.
b) Component mounting
Mounting allows every solder ball to align with the corresponding pad on the PCB. Since the pins are too short to be visible to the naked eye, certain machines are used for accurate alignment during the mounting. These machines include the popular BGA/CSP rework stations and chip mounter.
Mirror recognition is a method used to increase precision during mounting, although it doesn't ensure 100% excellent solder balls. Solderability can however be improved by reducing the height of the BGA component to 50.8μm and applying a delay shutdown vacuum system for 400miliseconds.
c) Reflow soldering
This is arguably the most challenging step in BGA soldering. Nevertheless, an optimal reflow soldering curve must be achieved for perfect BGA soldering. The four reflow soldering phases, i.e. preheating, soaking, reflow, and cooling need to have their temperature against time adjusted so as to achieve the desired soldering quality.
d) BGA rework
After soldering BGA and inspecting, a rework must be done on a rework station if the component(s) is found to be faulty. The rework station chose must be able to solder and rework independently and without affecting the components adjacent to the BGA chip being reworked. You can work your way around this by covering the BGA chip with a hot air nozzle of a desirable size.
BGA Soldering advantages
BGA soldering offers some advantages over other methods. These advantages include:
Improved PCB design
Since a BGA structure has the contacts distributed over the full area of the package, the resultant lower track density solves the high-density problem around the package.
Stronger package
Other packages such as the quad flat pack experience many problems due to the close proximity of the pins. These packages are essentially destroyed by the slightest bending of the fine-pitch pins. BGAs are compact and thus not prone to bending.
Lower thermal resistance
Compared to a quad flat pack, a BGA has lower thermal resistance and hence the heat generated will be rapidly conducted to the PCB. This ultimately lowers the chance of overheating the chip.
Improved performance
BGAs have the conductors on the underside, considerably shortening the leads within the chip. Shorter leads result to lower inductance levels and therefore better signal integrity.
Conclusion
BGA soldering is one of the most effective PCB soldering techniques. At this point, you can solder and desolder BGA components, thanks to this guide but remember your chances of success as a beginner are narrow. Allow yourself time to learn and practice to reap the full benefit of soldering BGA components to a PCB, please feel free to contact us if you have any requirements for PCB.


